Saturday, April 25, 2015

Week 16 - Weekly Art Challenge

This week for the weekly art challenge, I chose to work with digital art again. I tried a new photo app that Deb Prewitt of Blue Twig Studio introduced to me. It's called SuperPhoto. These are the photos I created with the app on my Android tablet.

Mosaic filter on a hedgehog cactus in bloom photo that I took while taking a walk. 

A dragon I drew and painted was encapsulated in a melting ice cube with SuperPhoto. 

I isolated around the eye of the dragon from the above photo and used a graffiti filter.. I love the way this one turned out. It just needs some words splashed on the wall now! One of the other things I really like is that it's black and white photo with just a few touches of color here and there. 


I enjoyed trying out the SuperPhoto app. Not all of the resulting photos that I played with turned out well, but it's a fun app to continue experimenting with.  It is easy to use and has many options/filters to choose fun, even in the free app. It shows many other options/filters that can be used if you are willing to pay for these. Right now, there's enough for me to explore in the free portion.


Have a great week!
Keep creating!!
Lynnita


Friday, April 17, 2015

Week 15 - Weekly Art Challenge - Faces

This week for the Weekly Art Challenge, I've been working from Jane Davenport's Drawing and Painting Beautiful Faces. I enjoy creating portraits and want to be able to create faces better and use them in mixed-media artwork and also to create portrait paintings. I've done a few faces in past blogs posts (see posts here).

This week I did the exercises for "the Hot Zones" and "Jane-style whimsical proportions."  In the hot zones, Jane explains the distance between eyes, the stack of the nose, mouth and chin, how the lips line up with the eyebrows,  how the ears line with our facial features, and finally, the curve of the cheeks. In whimsical proportions, Jane shows how the proportions can be played with for drama and to look for what we find interesting and aesthetically pleasing.

These are the "whimsical  proportions" I focused on this week, while using the "hot zones" to keep the drawings balanced and proportionally pleasing.


Realistic Proportions, 3"x3", pencil and pen on mixed-media paper
Jane-style Proportions, 3"x3", pencil and pen on mixed-media paper
Fey, Tilted Eyes,, 3"x3", pencil and pen on mixed-media paper
Pixie, Large Wide-Set Eyes, 3"x3", pencil and pen on mixed-media paper
Feline, Large Eyes, Bunched Features, 3"x3", pencil and pen on mixed-media paper
Hollywood, Large Lips, Small Noses, 3"x3", pencil and pen on mixed-media paper
I think I still need some work on the faces, but playing with the proportions and placement of the features is a learning experience. It was interesting to see how varying these elements affects the way the face looks. It also helps me to know that I do not have to have realistic proportions all the time when working with portraits - they just need to be balanced and pleasing. Thanks, Jane!


Keep creating!
Lynnita


Tuesday, April 14, 2015

Blue Twig Studio - March Product Review and Projects

Deco-Art Media - black gesso, transparent crackle
glaze, white crackle paste, and white modeling paste
I had fun with the products from Blue Twig Studio for March. As a design team member, I review various products and create a project(s) with them.  The products I'm reviewing this month are:

  • Andy Skinner mixed media stencils - 
    • 6"x6" "Have Your Say" alphabet stencil 
    • Andy Skinner Stencils - 6'x6" alphabet and 12"x3" tread
    • 12" x 3" Tread Carefully 
  •  Deco Art Media
    • Black Gesso
    • Transparent Crackle Glaze
    • White Crackle Paste
    • White Modeling Paste
  • My own products added to create projects
    • Matte medium
    • Acrylic paint
    • Dylusions Ink Sprays:
    • Paper ephemera (magazines, music)
    • Tim Holtz Distress Paints
    • Luninarte Silks Acrylic Glazes
    • Palette knife
    • Stencil brush

Projects:  I created two pieces of art using these products. I started both on 8" x 10" canvas boards.

Collage Project:  

 I layered various pictures from magazines, music, and words in a
pleasing arrangement and glued them down using matte medium. 
 
 Next, I spritzed the board with yellows, pinks and purple Dylusion Ink sprays.
I spread the white modeling paste through the tread stencil 
with a palette knife to various areas of the collage.
I painted the dried white modeling paste with blue, maroon, and gold Luminarte Silk Acrylic Glazes.  I chose the Silk glazes, as they have a sparkle to them when dry. I added a light purple acrylic paint to the white crackle paste and spread that with the palette knife through the alphabet stencil.
Finally, after the paint and crackle paste had dried, I added the transparent crackle glaze over the eye, flowers in the vase, and cheetah heads. Unfortunately, in the photo, the crackle effect from both the purple crackle paste and the transparent crackle glaze do not show up. However, the transparent crackle glaze adds a wonderful sparkle to the collage.


Stenciled ZIA Project:
Initially, I covered the canvas board with the black gesso and let it dry. Next I spritzed copper, gold, blue, and lime green Dylusion Ink sprays using papers to mark off broad lines to spray.
Next, I painted various metallic acrylic paints and a few Tim Holtz distress stains in blue, copper, pink and purple through the Tread Carefully stencil with a stencil brush diagonally across the stripes. I painted a 2nd Tread Carefully diagonal in light blue, fern green, and pinks in the opposite direction.  
Next, I spread the white modeling paste with a palette knife through various 6" x 6" stencils that reminded me of Zentangle tangle patterns. Note: the lime green Dylusions ink bled through the white modeling paste even though it had cured for 24 hours.
Finally, I painted the modeling paste with white acrylic paint where the lime green Dylusion ink had bled through.  Unfortunately, in the photo, the Dylusion ink stripes do not show up very well through the modeling paste like they actually appear. I decided this project was complete, as it reminded me of a Zentangle, but done with stencils, paint, and modeling paste!

Product Review:  
       I enjoyed working with this month's products. The stencils are fun and will be used frequently. I can see the Tread Carefully, not only as a tread, but as animal skin, dragon skin, stones, landscape, and so on. The Alphabet stencil will come in handy for many mixed-media projects.
       Black gesso will be wonderful for making colors pop or to just do something different than using white gesso for a base. 
       The modeling paste spreads very easily with a palette knife through the stencils - even in small openings. It dries semi-transparent, as I could read some of the letters and music after it had dried in the collage project. However, I did find that the lime green Dylusions ink bled completely through the modeling paste in the ZIA project. A bit of the yellow Dylusion ink bled through the modeling paste in the collage paste, but not as dramatically as the lime green bled. None of the other Dylusions ink colors bled at all.
       The white crackle paste worked wonderfully. It mixed easily with paint, so color can be added to the paste. It spread easily with the palette knife through the stencil. Although, once I added paint, it bled a bit under some of the thinner lines in the stencil. I was able to remove the paste with a small paintbrush or toothpick where it had bled under the stencil in many cases.
       The transparent crackle glaze adds a nice sparkle. It is self-leveling, so it does not work under stencils. I tried it with the Tread Carefully stencil and it spread terribly, so I scraped it off with the palette knife before it dried. Therefore, only use the transparent crackle glaze on open areas. Also, I used a toothpick to pop any bubbles. One comment: it was hard to see if I had the areas I wanted covered coated evenly. I wasn't able to tell until it had dried. I did not try to add another layer in thinner areas. 


Thank you for joining me this month. The projects can be seen at Blue Twig Studio in Colorado Springs, Colorado. I hope you will consider trying some of these products. 

Keep creating.
Lynnita


Monday, April 13, 2015

Week 14 of Weekly Art Challenge - Blended Photos

I've been out of commission for a few weeks now with my weekly art challenges. My granddaughter was born premature the beginning of Feb and spent 3 weeks in the hospital. She along with my daughter and son-in-law are now living with us, so it's been an adjustment. She is a special needs child with a heart defect and Down syndrome. She's a little angel and such a blessing, but she's keeping us all busy with appointments and not sleeping at night - all the things newborns come with!

I've decided not to do the Documented Life Project 2015 by Art to the 5th Academy, that I originally wanted to do. Initially, I didn't get started on time, as the journals were back-ordered. By the time it arrived, my granddaughter had been born.  Unfortunately, I do not have a dedicated studio. I use either the kitchen table or cover my quilting table to create art. I cannot leave all my paints out every where with the kids living with us, like I could when it was just my husband and I. He didn't mind having my artwork spread out everywhere.  It's easier for me at this point to continue with sketching, doodling, or creating digital art every week. So this is what I'm going to concentrate on for the time being to help me get back into the habit of being creative each week and posting a weekly "sketch" each week.

For this week, I'd been working on digital art by blending photos. I used Pixlr Express photo editing software on my tablet. They added blending photos to the app, which I'm enjoying exploring. This is what I've created this week.

Tree taken on a foggy morning in Ohio blended with a sunset in AZ. Used the additive blending mode.
This is the same blended photo as the first picture. Added a special effect overlay.
The same blended photo with neon light overlays and firework overlays added.
Same photo again but with various light overlays and flower stickers added.

Pixlr Express is a fun photo-editing software with the basic editing features. It also has many added features, such as special effects, overlays, stickers, various brushes to create painting effects, fonts, etc. Right now I'm focusing on experimenting with the blending photos, overlays, and effects features.


Keep creating!
Lynnita


March Book Club - Show Your Work

March's book for the Blue Twig Studio's monthly book club was "Show Your Work" by Austin Kleon.  It is the sequel to "Steal Like an Artist", which we read last year in June (see post dated July 1, 2014).  Austin Kleon is a writer with a wonderful sense of humor and many insightful views on creating artwork (as seen in "Steal Like and Artist)  and getting it seen by a larger audience (see "Show Your Work").

I have to admit that I first read Austin Kleon's book, "Show Your Work" last year and reviewed it for July's book review, as I couldn't find the book that was being read that month. So you can see my previous review here (dated July 30, 2014).

This book is worth reading a second time! Kleon focuses on using the community of artists to help make your work "findable" (putting your artwork out in the community where others can find you). It's more about discovering yourself (rather than promoting yourself), by sharing your process with others, so they will want to "steal" from or be influenced by you (see his first book). Once people start getting inspiration from your work or being influenced by your work, you will find that you have been "discovered"!

Kleon gives much advice on good manners for sharing and the pitfalls of oversharing, as well as, using the Internet for sharing - like building a good domain name and giving credit where credit is due. His books helps layout plans for succeeding as an artist - any kind of artist - in this digital age.

A couple of quotes Kleon used that inspire me are: 

     "Find your voice, shout it from the rooftops, and keep doing it until the people that are looking 
       for you find you." - Dan Harmon

     "Carving out a space for yourself online, somewhere where you can express yourself and share 
       your work, is still one of the best possible investments you can make with your time." - Andy Baio

Kleon helps me see that anyone can be an artist, even if it's not full-time. Don't be afraid to sell your work! Teach and share with others. Keep creating!  His books do not take long to read if you are interested. Also, you can find more about him and his work at www.austinkleon.com


Next month's book (and for the next several months) is "Creative is a Verb" by Patti Digh. It will be spread out over several months so we can work through several of the exercises in the book. For April, read Part 1, which includes chapters 1-3 of the book. Please join us!


Keep creating!
Lynnita


March ATC Challenge - Fairy Tales

It's been a couple hectic weeks. I'm running behind in posting again! Someday, I'm going to figure out how to help my daughter and son-in-law with their special needs daughter, taking her to several doctor's appointments, babysitting my other grandchildren, posting photos of all the grandchildren for our Ohio family on facebook, continue creating artwork and quilts, while finding time to post on my blog!! I'm not sure how young mothers do it all!!  I was doing fine until our special granddaughter was born prematurely. Since then, I've been struggling to post at all, let alone in a timely manner! Lol!!

Today, my goal is to get a few posts completed that I should have posted in the last couple of weeks. First is Blue Twig Studio's ATC Challenge for March, which was Fairy Tales.  I have loved fairy tales since I was a child. Two of my favorite books as a child were Grimm's Fairy Tales and a book of tall tales and fables that my parents gave me for Christmas when I was 8 years old. I still treasure those books. I've been a science fiction and fantasy reader ever since!

The first card I created was "Elfin Maiden". I used Dylusions Ink Spray through a flower stencil on watercolor paper. After it dried, I blocked in a face with white paint. I used Derwent watercolor pencils to create the face and outlined details with a 0.1 black Sakura Micron Pen. The face was created with inspiration from Jane Davenport's book: Drawing and Painting Beautiful Faces.

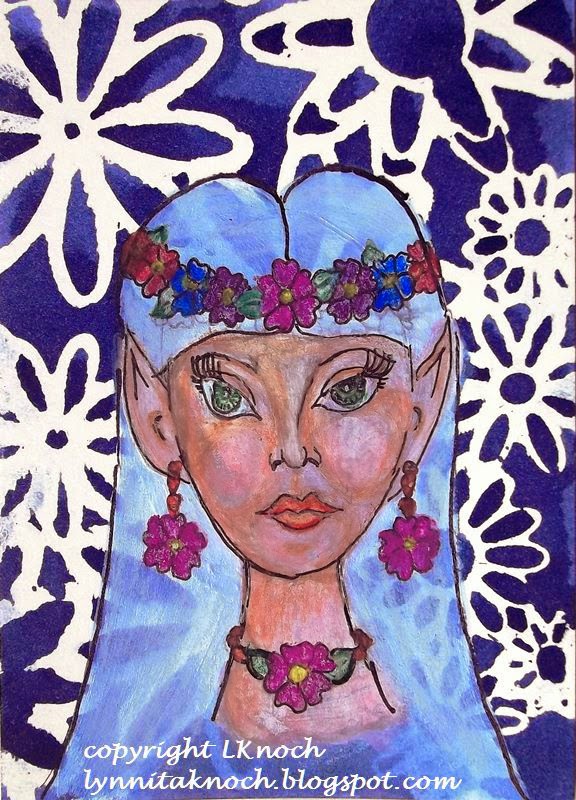
Elfin Maiden, 2 1/2" x 3 1/2", watercolor and inks on 140lb watercolor paper 
I love dragons and collect dragon figurines. The past year (if you've followed my blog), I worked through the exercises from a book on drawing dragons by J. "Neon Dragon" Peffer. This ATC card, The Reading Dragon, was inspired from one of her books. I painted the background with acrylics. After sketching in the dragon, I painted him with Derwent watercolor pencils and acrylics. I outlined with a 0.2 black Sakura micron pen.

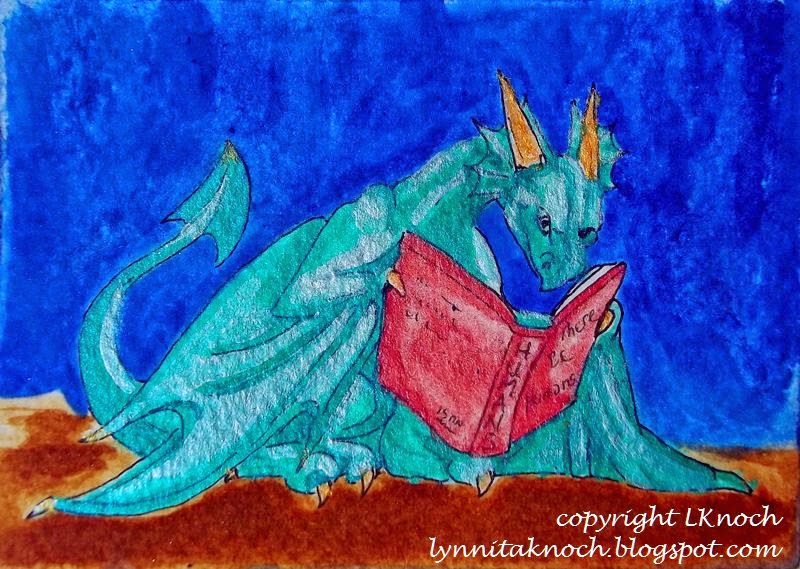
The Reading Dragon, 3 1/2" x 2 1/2", acrylics and watercolor on Bristol paper.
The final card is a prancing unicorn. My daughter told me I needed to make a unicorn, when I had been thinking about Red Riding Hood. The unicorn won out! With help from a book on fantasy creatures by J. "Neon Dragon" Peffer, Dragonart: How to Draw Fantastic Dragons and Fantasy Creatures, I created this proud unicorn.  I sketched in the unicorn and painted him with acrylics and Derwent watercolor pencils. I outlined him with a 0.2 black Sakura micron pen. I used watercolors to fill in the background.

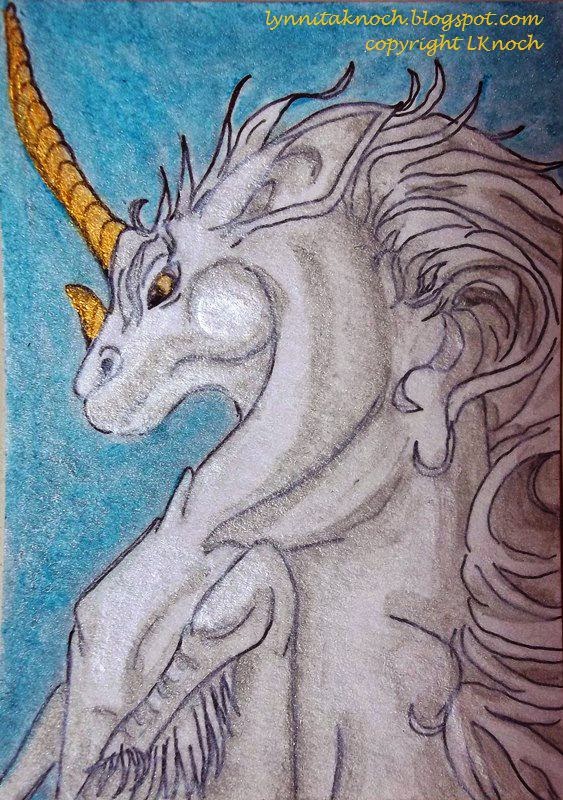
Prancing Unicorn, 2 1/2" x 3 1/2", watercolor and Sakura pen on Bristol paper.
I enjoyed this month's ATC challenge! I hope you join the group next month! You only need to make one ATC card. They are only 2 1/2" x 3 1/2" in size, so it doesn't take a huge commitment to create this size artwork. It's fun, challenging, a great time to experiment. And you might win!!

Whatever you decide, have fun with your artwork and experiment!


Keep creating!
Lynnita