Product:
Twinkling H2Os are highly pigmented, light fast, lusciously luminescent mica-infused watercolors. The H2Os are non-toxic and archival safe. The amount of water used determines if the color is opaque, translucent or transparent. This set contained 12 jars of H2Os, along with a free spritz bottle. The colors in my set included: poppy, rose gold, persimmon, mango mamba, mustard green, autumn butternut, black cherry, plum crazy, blue zircon, sweet alfalfa, cedar wood, and pearl red.
(Note: my spritz bottle arrived with a crack starting at the spritzer and running a third of the way around the spritz head. Needless to say, it didn't work very well as a spritzer, but was still able to use it as clean water. I could spritz, if I didn't mind water spraying )
 |
| Twinkling H2Os by Luminarte |
 |
| Open jars of Twinkling H2Os. Colors listed on cap to right of paint jar. |
 |
| Color chart for Twinkling H2Os. |
Projects:
 |
| Pico Embellisher in irRESISTible Neon colors. |
In interest of time, I chose to create several tags that can be used as gift tags, bookmarks, labels, luggage tags, and so on. My daughter joined me and made tags, as well. Following are the results. Besides brushes, a palette knife, and a freezer paper palette, I used Derwent watercolor pencils, black Sakura micron pens, and Pico Embellishers to accent the tags.
 |
| Lydia Tag, 2 3/4" x 5 1/5", Twinkling H2Os and Pico Embellisher on watercolor paper. I started with the plum crazy color to create a "sea" background. Then pulled the paint to the 'sky' area with more water to make it lighter. Using mango mamba, I created sun rays peeking through a stormy sky, and added pearl red to the 'sea' to create more depth and waves. I had planned to stamp dolphins in the 'sea'. However, the sea and sky didn't come out as they appeared in my head.After lifting some of the paint by adding more water, I used blue zircon to paint Lydia and outlined it with the mustard green (which appears more like an antique gold). I highlighted Lydia with a pink neon Pico Embellisher and edged the tag with pearl red. A couple hearts with a neon green Pico Embellisher in the corners, along with blue and multicolored yarn for hanging completed the tag. I am pleased with the results, as I thought this tag was a lost cause! (Painted by my daughter.) |
 |
| Peacock Feather Tag, 2 3/4" x 5 1/5", Twinkling H2Os on watercolor paper. Still wanting to make a sea with dolphins, I used the blue zircon for my 'sea' and painted the bottom half of the tag. I added sweet alfalfa for depth and waves. Now to create a sunset. I decided to practice the sunset on a different card (see dolphin card below). Since my sunset came out so nice, I just used that card instead of this one. Now what do I do with this card? The paint was dry, however, I found by adding water to the card, I was able to pull the blue zircon paint up to the top of the card, creating a blueish background with sweet alfalfa highlights. The color made me think of a peacock feather, since the blue zircon appears more teal than blue. Using shades of mango mamba, rose gold, persimmon, sweet alfalfa, and plum crazy, I stenciled a peacock feather onto the background. A small brush helped get into the narrow openings in this stencil without any bleeding under the stencil. (Painted by my daughter.) |
 |
| Dolphin Tag, 2 3/4" x 5 1/5". Twinkling H2Os on watercolor paper. Using mango mamba, rose gold, and black cherry, I freehand painted a sunset. I used freezer paper as a palette for mixing the paints for the sunset. I was pleasantly surprised when I found I could reactive the paint on the freezer paper up to 30 minutes after it had dried. I did not test how long the paint could sit and still be reactivated. I added the blue zircon for the sea, with highlights of sweet alfalfa. Painting plum crazy on a dolphin stamp, I was able to stamp two dolphins leaping out of the sea. This is my daughter's favorite tag. (Painted by my daughter.) |
 |
| Music Tag, 2 3/4" x 5 1/5", Twinkling H2Os and black Sakura micron pen on watercolor paper. I created an abstract background by brushing swirls of colors onto the tag. I used plum crazy, blue zircon, sweet alfalfa, and persimmon paints.Some of the paints I left opaque and others I thinned with water for more transparency (can't see this well in photo). I sprinkled salt on the wet paint. However, once dry, the salt didn't come off easily, so some was left in place. The salt created some texture in the plum crazy and persimmon colors, but not as much as I had hoped for. I used a 0.02 black Sakura micron pen to draw in music staffs and notes, as well as a saying by Oliver Wendell Holmes, "Most of us go to the grave with our music still inside us.". I found this in the book Creative is a Verb by Patti Digh, which I am reading for book club for April, May and June (see my review for chapters 1-3 here). This saying really struck a chord with me, so I had to put it on a tag. (Painted by Lynnita.) |
 |
| Blooming Tag, 2 3/4" x 5 1/5", Twinkling H2Os and Pico Embellisher on watercolor paper. I wanted to see how well the Twinkling H2Os did with a stencil, so I painted persimmon, rose gold, black cherry and mango mamba through a pod stencil. Unlike the peacock feather where I used a small brush to apply paint, I used a stencil brush this time. In the smallest pod at the bottom, the mango mamba mixed with rose gold paint was too thin and bled under the stencil. I used a blue Pico Embellisher to add the saying, "Life is an empty square unless one fills it up with matter!" by Robin Antar. This was another saying in the book, Creative is a Verb. (Painted by Lynnita.) |
 |
| Pondering Tag, 2 3/4" x 5 1/5", Twinkling H2Os, Sakura micron pen, and Derwent watercolor pencils on watercolor paper. I freehand painted the face first with pearl red, using blue zircon for the eyes and poppy for the lips. Her hair is cedar wood with autumn butternut highlights, while her top is rose gold with salt for texture. Using a flexible rubber stamp, I painted sweet alfalfa and blue zircon to create a background. The sweet alfalfa worked fairly well, but the blue zircon just bled everywhere. Once it was dry, I stamped over the blue zircon area with another stamp using the sweet alfalfa paint. I used Derwent watercolor pencils to add shading to the face and a 0.005 black Sakura micron pen to add the details. (Painted by Lynnita.) |
 |
| Luggage Tag, 2 3/4" x 5 1/5", Twinkling H2Os on fabric. Using pieces of Tim Holtz's Electric Elements fabrics leftover from the Nov 2014 Fabric club kit reviewed Dec 1, 2014,I cut small pieces of the fabric and enhanced the print with the Twinkling H2O paints in several of the colors. Once the paint dried, I heat set it. I stitched a collage of the fabric for the front of the luggage tag. I finished the edge with a piece of fuzzy, multicolor, eyelash yarn. The hand of the fabric stayed soft for the luggage tag front. (Painted by Lynnita.) |
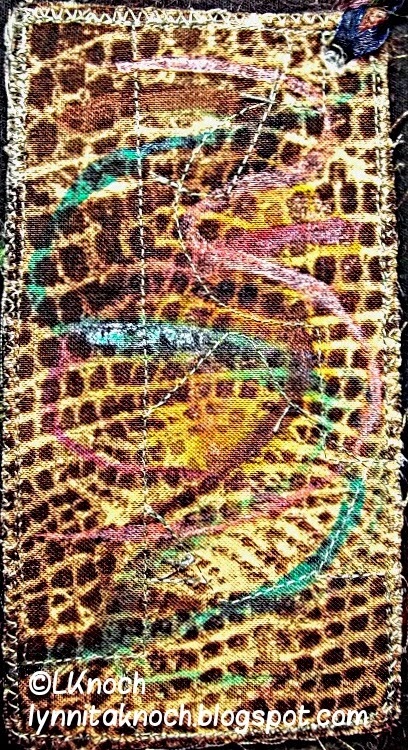 |
| Luggage Tag back. I scribbled with several colors of the Twinkling H2Os on the back of the luggage tag just to test the hand of the fabric. I used a substantial amount of the mango mamba in the center, but smaller amounts of several other colors. Once it was dry, I heat set the paint. Where I used the larger amount of the mango mamba, the fabric was stiff, but in the other areas, the fabric still has a soft hand. The twinkling H2Os work well on fabric, but use a small amount to keep a soft hand. I didn't realize I was out of the clear vinyl to create a pocket on the back of the luggage tag for the address. So this will be added later. (Painted by Lynnita.) |
Product Review:
I thoroughly enjoyed working with the paints - they are bright, luminescent and easy to use. I was able to reactivate the paints that dried on the freezer paper palette even after 30 minutes. This was awesome to find out! This ability to reactivate allowed my daughter to fix mistakes in a couple of her tags that she thought were lost causes. This also allows mixing the paints to create new colors, knowing that I won't waste paint from it drying out too fast.
The paints work well with both stencils and stamps, although you want to use stamps that are deeply etched, have thick, wide lines, bold graphics, and/or large surface areas. Avoid stamps with shallow tiny detail lines. These do not work very well. When using stencils, be sure the paints are not extremely wet, so they do not bleed under the stencil. Also a small brush can be used to paint in small stencil openings.
I have one negative comment. It was stated that the paint needs to be dry before closing the jars. Even in the 'dry' Arizona heat, the paints were still wet after 2 1/2 hours. I closed them, anyway, as I was ready to sleep by 1:00 am. When I checked them the next day, all the paints were still wet, paint had gotten on the lids making it difficult to open a couple of them, and two of them had actually leaked. So I left them open again.It still took another 2-3 hours before they were fully dry and I could close them. This will create a challenge for me to use them, as I do not have a dedicated work space at the moment and cannot leave opened jars of paint out where grandchildren could get a hold of them.
I hope you enjoyed this review and will consider using these wonderful, sparkling watercolors! They are worth buying, even if you have many other paints!
Keep creating!
Lynnita
The paints work well with both stencils and stamps, although you want to use stamps that are deeply etched, have thick, wide lines, bold graphics, and/or large surface areas. Avoid stamps with shallow tiny detail lines. These do not work very well. When using stencils, be sure the paints are not extremely wet, so they do not bleed under the stencil. Also a small brush can be used to paint in small stencil openings.
I have one negative comment. It was stated that the paint needs to be dry before closing the jars. Even in the 'dry' Arizona heat, the paints were still wet after 2 1/2 hours. I closed them, anyway, as I was ready to sleep by 1:00 am. When I checked them the next day, all the paints were still wet, paint had gotten on the lids making it difficult to open a couple of them, and two of them had actually leaked. So I left them open again.It still took another 2-3 hours before they were fully dry and I could close them. This will create a challenge for me to use them, as I do not have a dedicated work space at the moment and cannot leave opened jars of paint out where grandchildren could get a hold of them.
I hope you enjoyed this review and will consider using these wonderful, sparkling watercolors! They are worth buying, even if you have many other paints!
Keep creating!
Lynnita


