Friday, February 14, 2014

Noriko Endo's Painting with Needles - Possibilities of Free-Motion Quilting class at AQS Show in Phx, AZ Feb 2014

The second class that I took with Noriko Endo was her Painting with Needles: Possibilities of Free-Motion Quilting. I had no idea what to expect from this class, but her sample on the AQS website looked interesting, so I signed up for the class. I also figured I could always use more practice with my free-motion quilting.

These are the samples Noriko showed us for the class:
Thread painted portrait enhanced with paint by Noriko Endo. Approx 30" x 45". 
Maple leaves by Noriko Endo. Approx. 35" x 20". 
Feathers and Doodles by Norido Endo. Approx 20" x 16". 
Feather motif by Noriko Endo. Approx. 20" x 16". 
 
Noriko Endo in duster length vest thread-painted  with a feather variation, enhanced
with paint. Noriko painted the fabric for the vest and then quilted it and filled in the
quilted motifs with more paint to help the motifs stand out. 

Noriko had us pick a motif and quilt it in various sizes on our quilt sandwich. She encouraged us to use a variegated polyester thread. Depending on the motif, she had us either echo it, fill the motif, and/or go over the stitching 2-4 times to emphasize the outlining. After stitching the motifs, we then picked areas to paint with acrylic paints. Noriko doesn't use any special fabric paints on her quilts, just acrylics. She said sometimes we'll want to paint the quilt first and then quilt and other times, we'll quilt first and then paint, or a combination of the two. When we get home, we will finish painting the motifs and then fill in the background with more free-motion quilting.

I chose a pink batik for my background fabric. It is a fabric that I hand-dyed. I don't use pink much and wanted to do something different for this class. Choosing the motif(s) was about the hardest part of this class, followed by how to lay out the motifs to get a pleasing composition. Once I started stitching, things just seemed to flow. I had never done so many layers of feathers within one feather design or stitched such a small pebble design. It was challenging, but fun, too. I was surprised when I saw my piece after getting to a point where I was ready for painting. I couldn't believe that I did this sample!

My sample, approx 18" x 16". I decided to stitch feathers and swirls with pebbles, 
similar to one of Noriko's samples. Noriko had me fill in the feathers with more two 
more sets of feathers inside my original ones, in a different color variegated thread. 
loved the way they turned out. Then I filled in the one set of feathers and some

of the pebbles with blue acrylic paint.  When I have time to finish this at home, I

plan to fill in the other set of feathers and more pebbles with another color of paint.
Then I will fill in the background with more free-motion quilting. 

Following are a couple samples from a couple other students in the class. I didn't get too many photos of others' work, as by the time I finished, most of the other students had already left.

A fish motif in the process of being painted.  She was pleased with how it was turning out, as she

had never done any fabric painting before. She was very tickled with the paint on the fish lips. 
Done painting the fish! 
A seascape quilted and painted by another student. She had done a similar seascape for 

her very first quilt some 20 years previously. She was planning to compare the two once

she finished this one to see how much she has progressed since she started quilting.

Quilt designs copyrighted by Noriko Endo or the student creating the quilt.

Thursday, February 13, 2014

Noriko Endo's Naturescapes from Scraps 1/2 Day Class at AQS Show in Phx, AZ 2014

I took three classes with Noriko Endo, an art quilter from Tokyo, Japan while attending the American Quilters Society (AQS) Show in Phoenix, AZ at the convention center Feb 5-8, 2014.  I became interested in Noriko Endo when I first saw her work hanging in the International Quilt Show in Long Beach, CA about 4 years ago. I watched her do a demonstration of her confetti landscape technique during the Sampler Class. It was so different from any quilting technique I had ever seen. It reminds one of the Impressionism art movement of the late 1800s, early 1900s. She captures the scene by "painting" with small bits of fabric, adding details with paint and thread.  Ever since then, I've been wanting to attend a workshop with her. She was one of the many instructors available during the AQS Show this past week.
Confetti Naturescapes by Noriko Endo, copyright 2011.

The first class I took with Noriko Endo is her Naturescapes from Scraps. Noriko also has a book published with this technique, Confetti Naturescapes: Quilting Impressionist Landscape. She offered this class twice - one a half day class and the other a full day class. I chose the half day class, as I figured with taking two other classes, this would be all I could manage with my health issues.

These are some of Noriko's samples for this class. She also had a quilt, Cherry Blossom #7, 58" x 32", hanging in the show. It can be seen on my blog from yesterday of the quilts in the AQS show.


Noriko Endo's sample of trees and path. 8" x 8". 
Noriko's sample of flowering tree branches overhanging water. 20" x 30"

Noriko's sample of a summer or spring forest. 25" x 20"
Noriko's sample of an autumn forest. 25" x 20".
Noriko's sample of cherry blossoms overhanging water. 25" x 20". 

I thoroughly loved the class. Noriko is a gracious teacher, gently encouraging each person to create a small art quilt of a landscape. She adds bits of confetti fabric before you quilt it, to help the colors pop and explains why she adds these colors to your quilt. She added bits of black, as she said black is in everything; though our eye may not see it, our brain picks it up, so add black to make your landscape look right. Then she added turquoise, as she said this helps the colors pop. She also added bits of bright purple and pink to mine, since I had those colors in my landscape. These seemed so bright when she added them, but they really did help the colors pop. After taking her class, I viewed the Tentmakers of Cairo exhibit. They used bright colors, like turquoise and orange and white accents. These made the colors pop in their wall hangings. It really helped reinforce this lesson from Noriko.

Here is my small quilt sample that I completed in class. I was getting frustrated while free-motion quilting my sample, but realized that I just needed to relax and enjoy the process, which I loved. It was so much fun to just cut the scrap fabric pieces into confetti and then scatter them (strategically) over the batting to create a landscape. I found it to be very freeing - I tend to work very tight and am always trying to loosen up. This technique definitely encourages that!

My sample. 10" x 10". 

Some of the other students in the class, allowed me to take photos of their projects. I think everyone had fun creating these little pieces of art. As Noriko said, they look better when viewed from a distance (5-6 feet), like you would view masterpieces in an art museum. You don't look at them closeup, unless you want to examine the brush strokes. In these samples, the brush strokes are the small pieces of fabric.

Student sample of flowering trees. Approximately 9" x 9".
Student sample of trees and flowers bordering a lake. Approximately 10" x 10". 
Student sample of trees and flowering bushes.  Approximately 8" x 6". 
Student sample of red roses and other flowers. She plans to applique one
 red rose and stitch more red roses in the red area. Approximately 9" x 9".

All quilt designs copyrighted by Noriko Endo or the students in the class. 


AQS Quilt Show in Phoenix, AZ continued

Following are more photos of some of the quilts at the AQS Quilt Show held in Phoenix at the convention center last week. These quilts are ones that spoke to me for one reason or another.

These first five quilts are in the more traditional category.

Upper Body Workout Improved by Laura Trenbeath of Pavillion, WY. 45" x 50".
First place Wall Quilts - Traditional. The quilted Victorian scroll work in metallic
thread was beautiful. The added crystals made it sparkle. 
Civil War Bride by Judy Elliott of Edmond, OK. 70" x 72". The pattern
is Corliss Searcey's Civil War Bride pattern.  Wall Quilts - Traditional category.
I love Baltimore Album quilts. They were done generally as part of a trousseau to
show off sewing skills. Some year I will finish the Baltimore Album quilt I'm creating.  
Kootenay Peony by Dawn Fox Cooper. 45" x 45"  Second Place in the
Wall Quilts - Traditional category. I enjoy the red-and-green quilts of the 1800s.
This one is beautifully done. I love the ruched ribbon peony.
Oh, Mexico Beach by Jane Zillimer of Mercer, WI. 85" x 85" Honorable Mention
in the Bed Quilts-Innovative category. I love the cute sandpipers and other
shore birds she's added to the traditional fan pattern. It's a fun quilt.  
Mistaken Identity by Gail Stepanek and Jan Hutchison of New Lenox, IL. 83" x 83".
First Place in the Bed Quilts- Traditional category. The 21 point blocks are a Sunburst
variation. I love the movement the radiating quilting design adds.  
Mistaken Identity closeup to show the beautiful, radiating quilting pattern. 

The rest of the quilts shown are in the art quilt category. Some are innovative, fun or just plain whimsical!

Climate Change by Gail Garber and Kristin Vierra of Rio Rancho, NM.  42" x 52". I love the curved
piecing and flying geese in this quilt. I took a workshop with Gail Garber to learn these techniques.
She's an excellent teacher and made the class fun. I'm excited to add these techniques to my designs.
Giant Panda by Anne F. Zick and Joyce Freehill of Hinsdale, IL. 37" x 38". The design source is
from Endangered Species Quilt Project by Rob Appell. I think pandas are beautiful creatures. 
 
Quilteenies 3: Going Ape! by Carol Steuer of Brooklyn, NY. 54" x 59". This is just such a fun, whimsical
quilt. The apes are quilted individually and then attached to the border.  This quilt just made me laugh!
Dancing to the Sky by Janet Haefner of Tucson, AZ. 41" x 64". I live in AZ, so this quilt
really speaks to me. I love the various Kachina figures, celebrating on the mesa top and down
in the pueblo. Unfortunately, the photo does not show the dimensionality of the figures. 
Okanagan Sunrise by Naomi Pearson of Vernon, British Columbia, Canada. 30" x 30".  The design
for this landscape is so original. I like how the sunrise radiates out from the mesa or mountains
and the fields radiate downward from the mountains and are represented by a diamond block . 
Sweet Nectar by Barbara Kilbourn of Ann Arbor, MI. 31" x 31".  The quilt was inspired by a
photo taken by her daughter. I love how large she made the bee, bringing us into the bee's life.
I could go on for pages with photos of the quilts at the AQS Show. It was wonderful to see. Another special exhibit was the Route 66: Honoring Main Street USA, which was fun and whimsical. Bobby Troup's song encouraged all to "Get Your Kicks on Route 66". Nearly 50 artists created a personal favorite memory to honor this highway and the communities it went through. Route 66, also known as Main Street USA, connected Chicago to Los Angeles. The exhibit was curated by Kelly Gallagher-Abott and Patt Blair, who also created a wonderful painted backdrop to which the individual quilts were attached. It included 6 panels approximately 90" x 85" each.  If you get a chance to see this exhibit, go to it. It's worth seeing.

Wednesday, February 12, 2014

AQS Quilt Show in Phoenix Feb 5-8 2014

The American Quilter's Society (AQS) held their first show in Phoenix this past week (Feb 5 - 8) at the Phoenix Convention Center.The show was great fun. I enjoyed the quilt exhibits, as well as, all the vendors. As I said in a previous blog, my favorite exhibit was the Tentmakers of Cairo.  I enjoyed the SAQA exhibit, too.  SAQA is the Studio Art Quilts Associates. They are creative art quilters. You will have to check out their website, as you cannot photograph any of the quilts in their exhibit, as they are all original and generally for sale. It was a wonderful exhibit and I enjoyed their quilts.

There was also a Quilts of Valor exhibit. The mission of the Quilts of Valor Foundation is to cover all combat service members and veterans touched by war with comforting and healing quilts. One quilt really touched me from this exhibit.

Iwo Jima from the Quilted in Honor exhibit. (I'm not sure of exact name of 
quilt nor who made it. I didn't write it down. Sorry.) Except for the flag, the
rest of the fabrics are camo. This quilt really touched me because my father 
is a WWII veteran, serving in the Pacific in the Philippines. Our WWII vets 
are leaving us and their stories still need to be told. 

Some of the quilts from the Winner's Circle follow. The rest of the winners can all be seen here.
Best of Show Award - Isabelle by Kathi Carter of Vineyard, Utah. 93" x 93". 
Wandering 'Round My World by Beth Shillig of Columbus, Ohio,
60" x 38". 
Best Innovative Quilt Award - 
Hurricane by Janneke de Vries-Bodzinga, of Kollumerzwaag,
Friesland, Netherlands. 78" x 68".  
Best Wall  Quilt Award. 
 Spirit by Georgia Spalding Pierce of Seattle, Washington, 100" x 89"
Viewer's Choice Quilt Award - First Place Bed, Quilts - Innovative.

Some of the other quilts that I enjoyed can be seen here. I couldn't show all the photos I took as we'd be here for several pages!!
American White Pelicans by Velda Newman of Nevada City, CA, 
46" x 36". Wall Quilts - Innovative/Art.  I enjoy pelicans and the artist 
did a wonderful job painting this grouping. 
Autumn Fairy by Diane Hansen of Chandler, AZ, .31"x 31". 
Honorable Mention - Wall Quilts - Innovative/Art.  I attended
Patt Blair's workshop with Diane when she started this wholecloth
painted quilt. It's taken from a calendar by Linda Ravenscoft (with her 
permission). Diane did a wonderful job of painting and quilting. 
She deserves the Honorable Mention award!!
Autocar by Lynne Pillus of Oroville, CA 48" x 43".  Wall Quilts - Innovative/Art.

 This is a fun quilt. I love her expression of this vintage car. My dad is an 
auto mechanic and was always working on a car. This quilt brings
 back fond memories of helping my dad work on cars by handing him tool.s

Unravelings #2 by Judy Tescher of Pendleton, Indiana, 59" x 53".  

Third Place - Wall Quilts - Modern. I'm being drawn more and more to
the modern quilt movement. I like their simplicity, colors, and negative space.
More Than a Memory by Kathy McNeil of Tulalip, Washington, 62" x 52". 
Second Place - Wall Quilts - Innovative/Art. Her quilts are so lifelike. I 

enjoyed and learned so much in a workshop with her a couple years ago. 

Cherry Blossom #7 by Noriko Endo of Tokyo, Japan. 58" x 38". 

Wall Quilts - Innovative/Art. I first saw Noriko's work a few years ago
 at the International Quilt Show in Long Beach, CA. I love her 
landscapes -  they are so delicate and ethereal. 


Week 6 of 365 Days of Art Challenge

I was able to get some sketching done this week, in spite of taking classes at the AQS Quilt Show this past week. I had planned to post photos of the show and the classes I took prior to this, but have not had a chance get everything done yet, especially since I did want to get some sketching in.

I continued with the dragon anatomy exercises from J. "Neon Dragon" Peffer's DragonArt Evolution book.  This week I worked on the ears. I never really thought about dragons having ears, as I think of them as in the reptile family. I can't think of any reptile right now where you can really see the ears. My husband has snakes -no ears there. Lizards can have a small indentation or a hole where the ears are located, but you don't really see ears. Turtles and tortoises don't have ears that you can readily see. Hmmm... do dragons really have ears???  Guess it really doesn't matter, since dragons are mythological and/or fantasy creatures, and hence, can look anyway they can be imagined.  At any rate, I drew the sketches from the exercises in the book. Peffer lists 5 different types of ears.

Pencil sketch on drawing paper. From top to bottom - feathered
ear, long ear, and webbed ear.  
didn't think the cartilage in the ears looked right until I uploaded the photo onto my computer. I can see it now, especially in the webbed ear. I am happy with the sketches now that I can see them on the computer. Getting some distance from the drawing always helps to give me better perspective on what I'm drawing or designing. I tend not to look at sketches from a distance - just up close and that's rarely the best way to see if I'm achieving the effect I'm want. 

Pencil sketch on drawing paper.  Left - droopy ear. Right - upright
tufted ear.
I didn't try to draw complete dragon heads for each type of ear, as I wanted to be able to get these sketches done for this week's challenge. If I had drawn an entire head, I'd have only gotten one  type of ear completed. As I continue working my way through Peffer's book, hopefully, I'll be able to incorporate all the different body parts into complete dragons.

I'm enjoying the lessons. I hope you are enjoying the sketches.


Monday, February 10, 2014

Tentmakers of Cairo

At the AQS Show in Phoenix this past week, they had an exhibit of the Tentmakers of Cairo, Egypt. The wall hangings were just so beautiful! They are works of art!! I would live in a tent with the walls and floors covered with these. All the wall hangings were for sale. I was glad I went through the exhibit on the first day of the show. By the second day, several had been sold and were gone, including my favorite one, the cranes. They were very reasonably priced, ranging from around $450 to just over $2000. Price appeared to depend on the size, the complexity of the design,and who made the wall hanging. I would imagine some of the men had more experience than others. 

Tarek Abdelhay,  one of the tentmakers. He was 
very easy to talk with.  I so enjoyed watching him 
sew.  He was creating a 1/2" circle from a 2" square 
piece of fabric, clipping the fabric with 8" shears, 
while I watched him. I would've never gotten a 
round circle created this way!
Two tentmakers were there everyday, stitching their next wall hanging. It was fascinating to watch them sew. They are so quick. I was amazed at how large a needle  they use and at the large 8" shears to trim the fabric with. The needle looked like a size 16 or 18 chenille needle! I use a small size 12 straw needle and small 3" applique scissors to trim my fabric for applique work.  Their pattern is drawn onto a background fabric, which is attached to a canvas. The background can be any color, while the designs are a variety of colors. All the fabrics are solid colored cottons, of a fairly loose weave. I would have so much trouble with the fabric fraying, if I used the fabric they do! 

The prevalent designs are the lotus, a Romy (a vine-like design), geometric designs, and Islamic designs and writing. The tentmaker I spoke with said it takes him a couple weeks to make a wall hanging around 40" square. Wow! I've been working on a Baltimore Album quilt (by hand) for the past 5 years now and still have 4 more blocks plus the border to make.  I loved their designs! The wall hangings are so vibrant. I spent two days wandering the exhibit and watching the tentmakers sew. One was not supposed to take photos of the wall hangings, but when I asked if I could take some photos, I was told yes. Following are some of the photos I took of this exhibit.

Cranes. Approximately 40" x 40".  This wall hanging was so different from the 
other wall hangings.  I love the rich blues with red accents used to create the cranes.
I would've loved to buy this wall hanging, but unfortunately, it was not to be.

Lotus and Romy medallion design. Approximately 45" x 45". I'm drawn 

to this wall hanging for the medallion design and rich colors. 

Islamic design. Approximately 30" x 45".  I wished the tag told
what the words above the central geometric design mean in English
The writing itself is beautiful. The geometric design is lovely.

Blue Stars. Approximately 80" x 80". This geometric design with the flowing 
vines between the stars is just beautiful. It would make a gorgeous wall hanging, 
if you have a large wall space for it, or a beautiful bed cover. I would have loved 
to buy this one, too. However, this one was way beyond my budget.

Lotus and Romy designs. Approximately 40" x 50". I love the way
the turquoise and orange fabrics, along with the white outlining accents
make the design pop! Use of bits of turquoise, black, and bright colors
was one of the lessons from Noriko Endo in her confetti naturescape class. 
I enjoyed seeing that concept used in several of these Egyptian wall
hangings. Something to add to my own quilting designs. 

Romy columns and Vase with Lotus and Romy designs. Approximately 35" x 45". 
I love the columnar design of this wall hanging. Again, the orange and turquoise 
colors, with the white accents make the design pop! This is another wall hanging I 
would have liked to buy. Maybe in my next life!!

Vase of Lotus with Romy design. Approximately 25" x 35".  
This is a smaller wall hanging, but it is so beautifully done. 

Vase of Lotus Flowers. Approximately 40" x 40". I love the vase 
of lotus and the way the background highlights this vase. The blue 
stand and blue border gives a nice frame to the vase. This is another
wall hanging I would've loved to buy. 

Although I took all the photos, the wall hangings are copyrighted by the tentmakers of Cairo. I was given permission to take them, but not for anyone else to re-post or pin them.  You can check the Tentmakers of Cairo and their wall hangings out more on their Facebook page.

Sunday, February 9, 2014

Week 5 of 365 Days of Art Challenge

I'm a bit late getting week 5 of the 365 Days of Art Challenge posted. This past week has been filled to the max for me. I spent the beginning (and end) of the week working on the Bible Bowl for the teens for our church, the Mesa Church of Christ. I've been helping with creating the questions for the area-wide bowl for the past several years. Thankfully, this year, I don't have to create the presentation, too. Another person volunteered to do that. About 100 teens from churches of Christ all over Arizona, as well as a few from California and New Mexico, come and participate in the Bible Bowl. Everyone has a great time!

Then the rest of the week, I attended the AQS Quilt Show held for the first time in Phoenix. You can see a list of winners here. I will post more about the show later this week.  I also took 3 classes with Noriko Endo, a quilt and fiber artist from Japan.I will also post about these classes later this week.

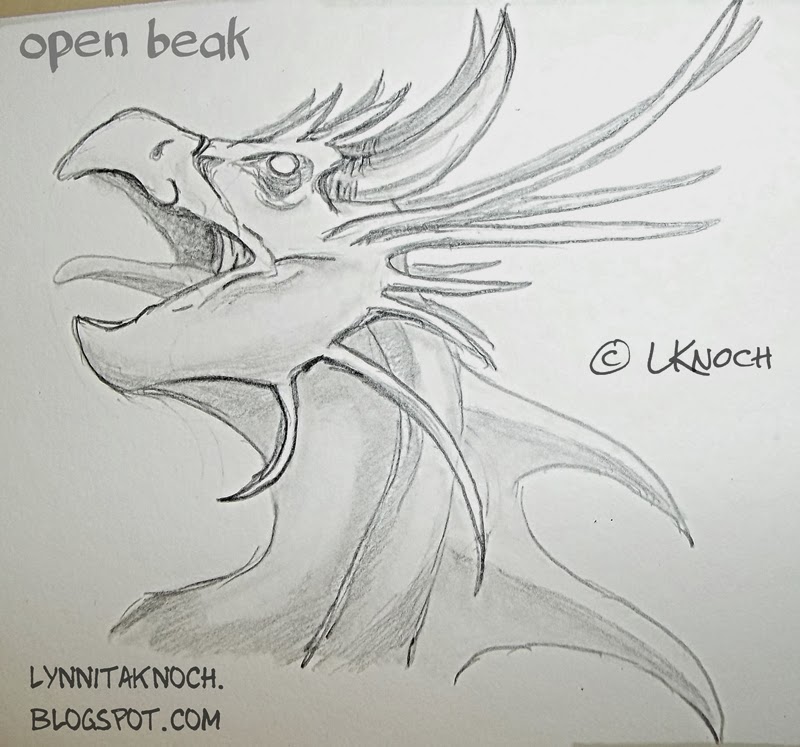
Today, I want to post my sketches I did this week. I continued to work on my dragon head sketches from J. "Neon Dragon" Peffer's book Dragonart Evolution.  I started with the eyes in week 3. In week 4, I drew 3 of the different types of jaws Peffer introduces. This week, I finished the other 3 type of jaws. Again I added more details to make an entire dragon head.

Pencil sketch on drawing paper. Closed under bite jaw.  In researching

dragons, I realized that I could use any animal to get inspiration for a 
dragon. I chose a ram's horns to create the horns for this dragon's head. 
Pencil sketch on drawing paper. Closed beak jaw. I added feather-like 
details for this dragon, like an archaeopteryx.   
Pencil sketch on drawing paper. Open beak jaw. I had the most fun 
drawing this dragon. I just added frills here and there for details. 
I just realized there's not a pupil in the last sketch with the open beak. But, that's okay. I'm learning to live with imperfections - I don't have to draw something perfectly before showing it off. I can just enjoy the process! I hope you enjoy my sketches, too.