Wednesday, February 12, 2014

Week 6 of 365 Days of Art Challenge

I was able to get some sketching done this week, in spite of taking classes at the AQS Quilt Show this past week. I had planned to post photos of the show and the classes I took prior to this, but have not had a chance get everything done yet, especially since I did want to get some sketching in.

I continued with the dragon anatomy exercises from J. "Neon Dragon" Peffer's DragonArt Evolution book.  This week I worked on the ears. I never really thought about dragons having ears, as I think of them as in the reptile family. I can't think of any reptile right now where you can really see the ears. My husband has snakes -no ears there. Lizards can have a small indentation or a hole where the ears are located, but you don't really see ears. Turtles and tortoises don't have ears that you can readily see. Hmmm... do dragons really have ears???  Guess it really doesn't matter, since dragons are mythological and/or fantasy creatures, and hence, can look anyway they can be imagined.  At any rate, I drew the sketches from the exercises in the book. Peffer lists 5 different types of ears.

Pencil sketch on drawing paper. From top to bottom - feathered
ear, long ear, and webbed ear.  
didn't think the cartilage in the ears looked right until I uploaded the photo onto my computer. I can see it now, especially in the webbed ear. I am happy with the sketches now that I can see them on the computer. Getting some distance from the drawing always helps to give me better perspective on what I'm drawing or designing. I tend not to look at sketches from a distance - just up close and that's rarely the best way to see if I'm achieving the effect I'm want. 

Pencil sketch on drawing paper.  Left - droopy ear. Right - upright
tufted ear.
I didn't try to draw complete dragon heads for each type of ear, as I wanted to be able to get these sketches done for this week's challenge. If I had drawn an entire head, I'd have only gotten one  type of ear completed. As I continue working my way through Peffer's book, hopefully, I'll be able to incorporate all the different body parts into complete dragons.

I'm enjoying the lessons. I hope you are enjoying the sketches.


Monday, February 10, 2014

Tentmakers of Cairo

At the AQS Show in Phoenix this past week, they had an exhibit of the Tentmakers of Cairo, Egypt. The wall hangings were just so beautiful! They are works of art!! I would live in a tent with the walls and floors covered with these. All the wall hangings were for sale. I was glad I went through the exhibit on the first day of the show. By the second day, several had been sold and were gone, including my favorite one, the cranes. They were very reasonably priced, ranging from around $450 to just over $2000. Price appeared to depend on the size, the complexity of the design,and who made the wall hanging. I would imagine some of the men had more experience than others. 

Tarek Abdelhay,  one of the tentmakers. He was 
very easy to talk with.  I so enjoyed watching him 
sew.  He was creating a 1/2" circle from a 2" square 
piece of fabric, clipping the fabric with 8" shears, 
while I watched him. I would've never gotten a 
round circle created this way!
Two tentmakers were there everyday, stitching their next wall hanging. It was fascinating to watch them sew. They are so quick. I was amazed at how large a needle  they use and at the large 8" shears to trim the fabric with. The needle looked like a size 16 or 18 chenille needle! I use a small size 12 straw needle and small 3" applique scissors to trim my fabric for applique work.  Their pattern is drawn onto a background fabric, which is attached to a canvas. The background can be any color, while the designs are a variety of colors. All the fabrics are solid colored cottons, of a fairly loose weave. I would have so much trouble with the fabric fraying, if I used the fabric they do! 

The prevalent designs are the lotus, a Romy (a vine-like design), geometric designs, and Islamic designs and writing. The tentmaker I spoke with said it takes him a couple weeks to make a wall hanging around 40" square. Wow! I've been working on a Baltimore Album quilt (by hand) for the past 5 years now and still have 4 more blocks plus the border to make.  I loved their designs! The wall hangings are so vibrant. I spent two days wandering the exhibit and watching the tentmakers sew. One was not supposed to take photos of the wall hangings, but when I asked if I could take some photos, I was told yes. Following are some of the photos I took of this exhibit.

Cranes. Approximately 40" x 40".  This wall hanging was so different from the 
other wall hangings.  I love the rich blues with red accents used to create the cranes.
I would've loved to buy this wall hanging, but unfortunately, it was not to be.

Lotus and Romy medallion design. Approximately 45" x 45". I'm drawn 

to this wall hanging for the medallion design and rich colors. 

Islamic design. Approximately 30" x 45".  I wished the tag told
what the words above the central geometric design mean in English
The writing itself is beautiful. The geometric design is lovely.

Blue Stars. Approximately 80" x 80". This geometric design with the flowing 
vines between the stars is just beautiful. It would make a gorgeous wall hanging, 
if you have a large wall space for it, or a beautiful bed cover. I would have loved 
to buy this one, too. However, this one was way beyond my budget.

Lotus and Romy designs. Approximately 40" x 50". I love the way
the turquoise and orange fabrics, along with the white outlining accents
make the design pop! Use of bits of turquoise, black, and bright colors
was one of the lessons from Noriko Endo in her confetti naturescape class. 
I enjoyed seeing that concept used in several of these Egyptian wall
hangings. Something to add to my own quilting designs. 

Romy columns and Vase with Lotus and Romy designs. Approximately 35" x 45". 
I love the columnar design of this wall hanging. Again, the orange and turquoise 
colors, with the white accents make the design pop! This is another wall hanging I 
would have liked to buy. Maybe in my next life!!

Vase of Lotus with Romy design. Approximately 25" x 35".  
This is a smaller wall hanging, but it is so beautifully done. 

Vase of Lotus Flowers. Approximately 40" x 40". I love the vase 
of lotus and the way the background highlights this vase. The blue 
stand and blue border gives a nice frame to the vase. This is another
wall hanging I would've loved to buy. 

Although I took all the photos, the wall hangings are copyrighted by the tentmakers of Cairo. I was given permission to take them, but not for anyone else to re-post or pin them.  You can check the Tentmakers of Cairo and their wall hangings out more on their Facebook page.

Sunday, February 9, 2014

Week 5 of 365 Days of Art Challenge

I'm a bit late getting week 5 of the 365 Days of Art Challenge posted. This past week has been filled to the max for me. I spent the beginning (and end) of the week working on the Bible Bowl for the teens for our church, the Mesa Church of Christ. I've been helping with creating the questions for the area-wide bowl for the past several years. Thankfully, this year, I don't have to create the presentation, too. Another person volunteered to do that. About 100 teens from churches of Christ all over Arizona, as well as a few from California and New Mexico, come and participate in the Bible Bowl. Everyone has a great time!

Then the rest of the week, I attended the AQS Quilt Show held for the first time in Phoenix. You can see a list of winners here. I will post more about the show later this week.  I also took 3 classes with Noriko Endo, a quilt and fiber artist from Japan.I will also post about these classes later this week.

Today, I want to post my sketches I did this week. I continued to work on my dragon head sketches from J. "Neon Dragon" Peffer's book Dragonart Evolution.  I started with the eyes in week 3. In week 4, I drew 3 of the different types of jaws Peffer introduces. This week, I finished the other 3 type of jaws. Again I added more details to make an entire dragon head.

Pencil sketch on drawing paper. Closed under bite jaw.  In researching

dragons, I realized that I could use any animal to get inspiration for a 
dragon. I chose a ram's horns to create the horns for this dragon's head. 
Pencil sketch on drawing paper. Closed beak jaw. I added feather-like 
details for this dragon, like an archaeopteryx.   
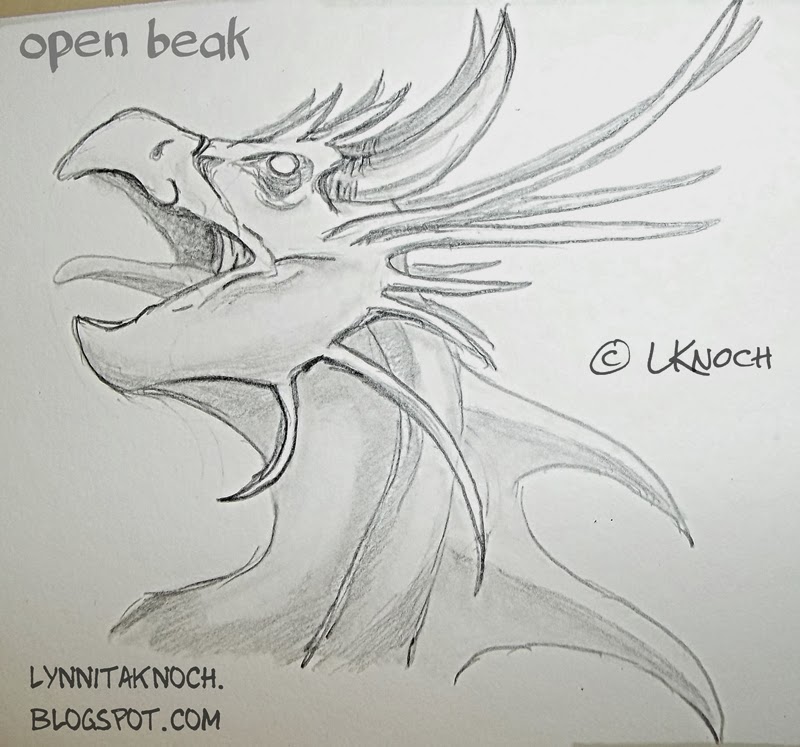
Pencil sketch on drawing paper. Open beak jaw. I had the most fun 
drawing this dragon. I just added frills here and there for details. 
I just realized there's not a pupil in the last sketch with the open beak. But, that's okay. I'm learning to live with imperfections - I don't have to draw something perfectly before showing it off. I can just enjoy the process! I hope you enjoy my sketches, too.

Thursday, January 30, 2014

Book Club with Blue Twig Studio

Deb Prewitt of Blue Twig Studio started on online book club this month. The book we read was  Art & Fear by David Bayles & Ted Orland.  Its about our fears about art - both with ourselves and others. Deb has a nice summary on her blog. 
I really enjoyed the book. It was very thought-provoking – making me think about: Why I create art? What are my fears about my art? Is it the process or the end product I’m concerned about? – as well as all the questions Deb mentioned in her blog. I agree with Deb – you have to make art for yourself – you have to forgot about others and what they think of your work and just do it!!
I took a few art classes many years ago in oil painting, colored pencil, and watercolor. I loved them. They made me get out of myself and do something that I grew to love and work on it every week. I participated in a few exhibits with the group I was involved with and even sold a few paintings and received a couple of commissions. Then the group started getting clique-ish and I was no longer welcomed because I didn’t live close enough.  (Looking back, I really think it was because I was one of only a couple people that actually sold anything or got commissions from the exhibits.)  I allowed myself to quit painting and drawing because of their attitude towards me. 
I started quilting, as I had always enjoyed sewing. I love quilting, too, but it took me awhile to get to where I felt comfortable making art quilts. This past year, I took a workshop in painting wholecloth quilts. This combines my drawing and painting background with quilting. Wow!! Who would've thought I could do that? 
But I still missed painting and drawing. A couple years ago, I discovered  Zentangles, They inspired me first as I thought they would be great to use for quilting designs. Once I started creating Zentangles or ZenDoodles, I wanted to get back to painting and drawing. However, now I want to do acrylics, watercolors, colored pencils, pastels, and mixed-media. I enjoyed oil painting, but the fumes are pretty strong.  So I think, for now anyway, that I'll stick with mediums that are more chemical friendly.
I've learned that I love making art because it’s part of me – I have to paint or draw or make an art quilt. I’ve finally gotten over my fears (most of the time! they still haunt me at times! LOL!) and make it for myself. I'm also learning to loosen up and not be so obsessed with perfection or details.  I want to enjoy the process more, not just get the finished product done. I do enter shows (not always accepted, but that’s okay – it’s a learning experience). I'm actually trying to enter more shows or exhibits on a national level, not just the local field. Like having four of my Zentangles accepted into a book - Zen Doodle Tons of Tangles. (see my blog posted Sept 9, 2013).  
All of this, is to let you know where I’m coming from and why this book, Art and Fear, really spoke to me. I had to read sections 2-3 times. I know now, from experience, what the book is trying to get across – just create because you want to and enjoy the process. If people like my work, fine, but if they don’t – that’s okay, too.  Art (and creativity) is a part of me.

Wednesday, January 29, 2014

Week 4 of 365 Days of Art Challenge

I continued to work from J. "Neon Dragon" Peffer's book Dragonart Evolution this week. I started her exercises on drawing dragon jaws.  After completing the exercise, I added some details to make a more complete dragon head.

Pencil sketch on drawing paper."Closed Overbite" jaw type. I like
the way this one turned out. I think the dragon has a cute face.

Pencil sketch on drawing paper. "Open Overbite" jaw type.  This
one looks a bit ferocious. I also think this one looks like it should 
be a sea dragon.

Pencil sketch on drawing paper. "Open Under Bite" jaw type.

This is as far as I got this week. There are still several jaw types I didn't get drawn, so I will probably do some more of these type of sketches next week. I will do a better job, too, of labeling my sketch correctly before shooting a photo of it to post on my blog page.

Sunday, January 26, 2014

Late January Sunset

My husband and I walked the dogs tonight to the local park during sunset. I took my camera with me and shot a couple of photos. I love sunsets. I would probably love sunrises just as much, but I just can't get up that early.
Taken from Shawnee Park in AZ
Taken from street on way back home. I love the plays of the mauves, 
purples, yellows and blues. The sky would make a lovely painted fabric
for quilting. May have to try my hand at that sometime. 

Wednesday, January 22, 2014

Week 3 of 365 Days of Art Challenge

DragonArt Evolution
by J. NeonDragon Peffer
This is week 3 of the 365 Days of Art Challenge. I didn't get much sketching done this week, as my hands were really bothering me. I have just one small sketch.  I love dragons and my nephew gave me a book on drawing dragons, DragonArt Evolution How to Draw Everything Dragon by J. "NeonDragon" Peffer for Christmas.  It looks like a great book and I'm looking forward to doing all the exercises in it. The author breaks down the dragon into various body sections and then finally puts them all together. She includes a variety of dragon types. This week I tried the 4 different types of eyes she demonstrated. I only used pencil. I need more work on the shading. Adding pen will be next and finally drawing them in full color using a variety of techniques, such as colored pencils, pastels, watercolor . . .whatever the dragon tells me.

The four types of eyes (orb, reptile, round pupil, and jewel) demonstrated in the book.

The other creative thing I did this week was dye silk scarves with a few friends. We used Colorhue Dyes and some Dye_Na-Flow Fabric Paints by Jacquard to dye the silks. Roberta and I first saw the Colorhue dyes at a demonstration at the Long Beach International Quilt Show a couple of years ago. It was quick and easy and not very messy. So we bought a package of dyes. They do not create very intense colors, but the colors are still beautiful and dyeing fabric is just so much fun. Following are the scarves I dyed. 
(Note:everything is dyed with Colorhue dyes, except where noted. Photos show half the scarf.)

11"x 60" Flat Crepe silk scarf.  Dyed using turquoise, blue, and lime green. Spritzed purple Dye-Na-Flow over punchinello to create a dotted pattern. The fabric paint bled everywhere and I ended up with mottled purple, instead of dots of purple. I plan to add some foiling later.   
11" x 60" Flat Crepe silk scarf. Painted a lime green stripe diagonally across the center, followed by turquoise, blue, eggplant, rose, and finally orange on either side of the green. Then I added black creating diagonal pleats going different directions across the scarf. I want to add some beaded fringe to the ends of this scarf. 
11"x 60"  Flat Crepe silk scarf. Lime green and green background. The flowers at the ends and in the center of the scarf  are created with a mix of turquoise, blue, eggplant,  and black.  Added some rose, goldenrod, and turquoise for highlights.  Used accordion folding the scarf to create the stripes. I plan to add some beads to the flowers and maybe some beaded fringe to the ends of the scarf.  (There isn't a line between the large flower and the stripes - it's a fold in the fabric that needs to be pressed out.)
11" x 60" Flat Crepe silk scarf. Goldenrod and orange background. Turquoise, blue and eggplant mixture for the spirals at both ends of the scarf. Added turquoise and goldenrod, creating the green center. Used a toothbrush to splatter emerald, blue, purple, and yellow Dye-Na-Flow fabric paint over the entire scarf.  I just love the excitement added with the splattering.  I think this scarf is my favorite of the ones I dyed today.

8" x 54" Habotai silk scarf. This was my clean-up scarf. Whenever there was excess dye left on the table, I used this scarf to wipe it up so as not to waste any of the dye. The more and more that I cleaned, the prettier and prettier the scarf became. Hard to believe this "waste" scarf has turned out so beautiful!! That's one of the reasons I like the Colorhue dyes. They adhere to the fibers so quickly, that the colors do not become muddy as colors are mixed on the scarf.